ConnectWise Manage Integration Setup Guide
Connect your ConnectWise Manage PSA to Scopable and sync companies, contacts, opportunities, configurations, and product catalog data.
Prerequisites
- Admin access to your ConnectWise Manage instance
- A Scopable account with admin permissions
- Your ConnectWise Manage login URL
- Ability to create an Integrator Login and generate API keys in ConnectWise
Step 1: Create API Credentials in ConnectWise
You need an Integrator Login with API keys so Scopable can securely communicate with your ConnectWise instance.
If your tenant is being moved to PSA powered by Asio, confirm the same API member and role behavior in the new screens before relying on production data. The migration checks in our ConnectWise Asio vs PSA guide are worth running before you touch a client record.
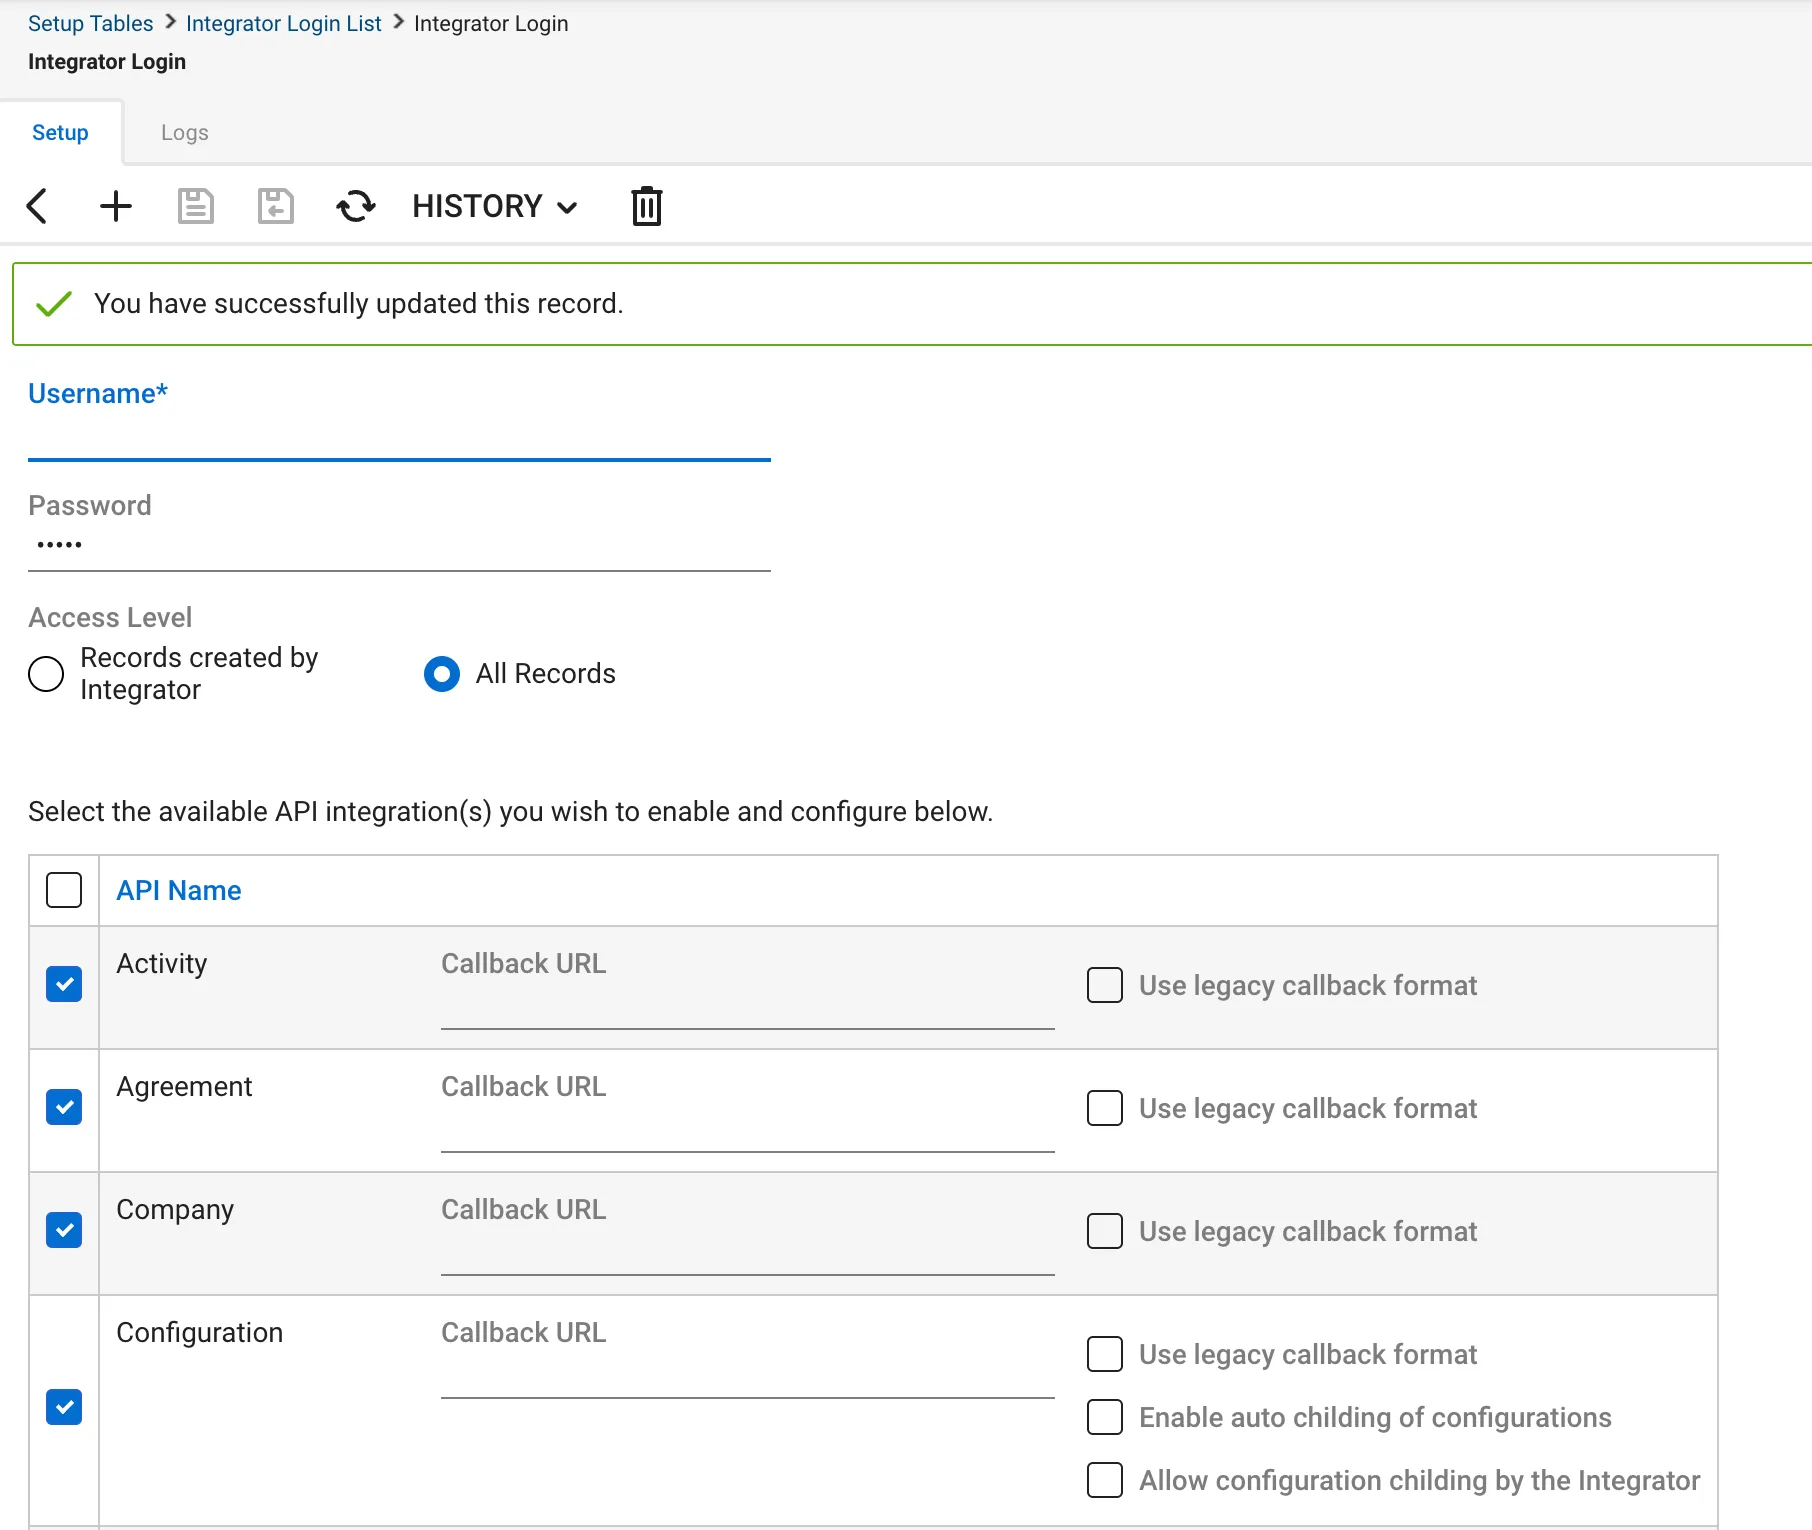
1.1 Create an Integrator Login
- Log in to ConnectWise Manage as an administrator
- Navigate to System → Setup Tables → Integrator Login
- Click Add to create a new integrator login
- Fill in the fields:
- Name: Scopable Integration
- Company ID: Your ConnectWise Login Company ID
- Access Level: "All Records" (required for full sync)
- Click Save
1.2 Create a Security Role
- Navigate to System → Security Roles
- Click + to create a new security role
- Name it (e.g., "Scopable API Role")
- Set the permission levels for this role as detailed in Step 2 below
1.3 Generate API Keys
- From the integrator login you just created, click Generate Public Key
- Click Generate Private Key
- Copy both keys immediately. The private key is only shown once and cannot be retrieved later
Step 2: Configure API Member Security Role
The API member used by Scopable needs specific permissions in ConnectWise to read and write the data it syncs. Create a dedicated security role (or modify an existing one) with the following settings. Everything not listed here should stay at None.
The four columns in ConnectWise security roles are Add, Edit, Delete, and Inquire.
Companies
| Permission | Add | Edit | Delete | Inquire |
|---|---|---|---|---|
| Company Maintenance | None | None | None | All |
| Company/Contact Group Maintenance | None | None | None | All |
| Configurations | None | None | None | All |
| Contacts | All | All | All | All |
| CRM/Sales Activities | None | None | None | All |
| Manage Attachments | All | All | All | All |
| Notes | None | None | None | All |
| Team Members | None | None | None | All |
Finance
| Permission | Add | Edit | Delete | Inquire |
|---|---|---|---|---|
| Accounting Interface | All | All | All | All |
| Agreements | None | None | None | All |
| Invoicing | All | All | None | All |
Procurement
| Permission | Add | Edit | Delete | Inquire |
|---|---|---|---|---|
| Product Catalog | None | None | None | All |
| Products | All | All | All | All |
| Purchase Orders | All | All | All | All |
Sales
| Permission | Add | Edit | Delete | Inquire |
|---|---|---|---|---|
| Closed Opportunity | None | None | None | All |
| Opportunity | None | None | None | All |
| Opportunity Finance | None | None | None | All |
| Sales Orders | All | All | All | All |
Service Desk
| Permission | Add | Edit | Delete | Inquire |
|---|---|---|---|---|
| Close Service Tickets | All | All | All | All |
| Merge Tickets | All | All | All | All |
| Resource Scheduling | All | All | All | All |
| Service Ticket - Dependencies | All | All | All | All |
| Service Tickets | All | All | All | All |
Project
| Permission | Add | Edit | Delete | Inquire |
|---|---|---|---|---|
| Close Project Tickets | None | None | None | All |
| Close Projects | None | None | None | All |
| Project Contacts | None | None | None | All |
| Project Headers | None | None | None | All |
| Project Management | None | None | None | All |
| Project Notes | None | None | None | All |
| Project Phase | None | None | None | All |
| Project Product | None | None | None | All |
| Project Teams | None | None | None | All |
| Project Ticket - Dependencies | None | None | None | All |
| Project Tickets | All | All | All | All |
Time & Expense
| Permission | Add | Edit | Delete | Inquire |
|---|---|---|---|---|
| Time Entry | All | All | All | All |
System
| Permission | Add | Edit | Delete | Inquire |
|---|---|---|---|---|
| API Reports | None | None | None | All |
| Member Maintenance | None | None | None | All |
| Member Maintenance - Finance | None | None | None | All |
| Security Roles | None | None | None | All |
| Table Setup | None | All | All | All |
If you're not syncing a particular data type (e.g., Projects or Time), you can skip those permissions. The tables above represent the full set needed for all current and upcoming sync capabilities.
Step 3: Open the Setup Wizard in Scopable
- Log in to Scopable as an Admin
- Click Integrations in the left-side navigation under Administration
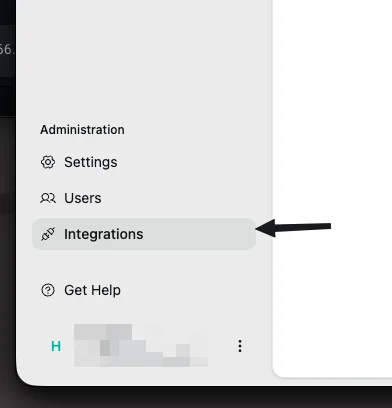
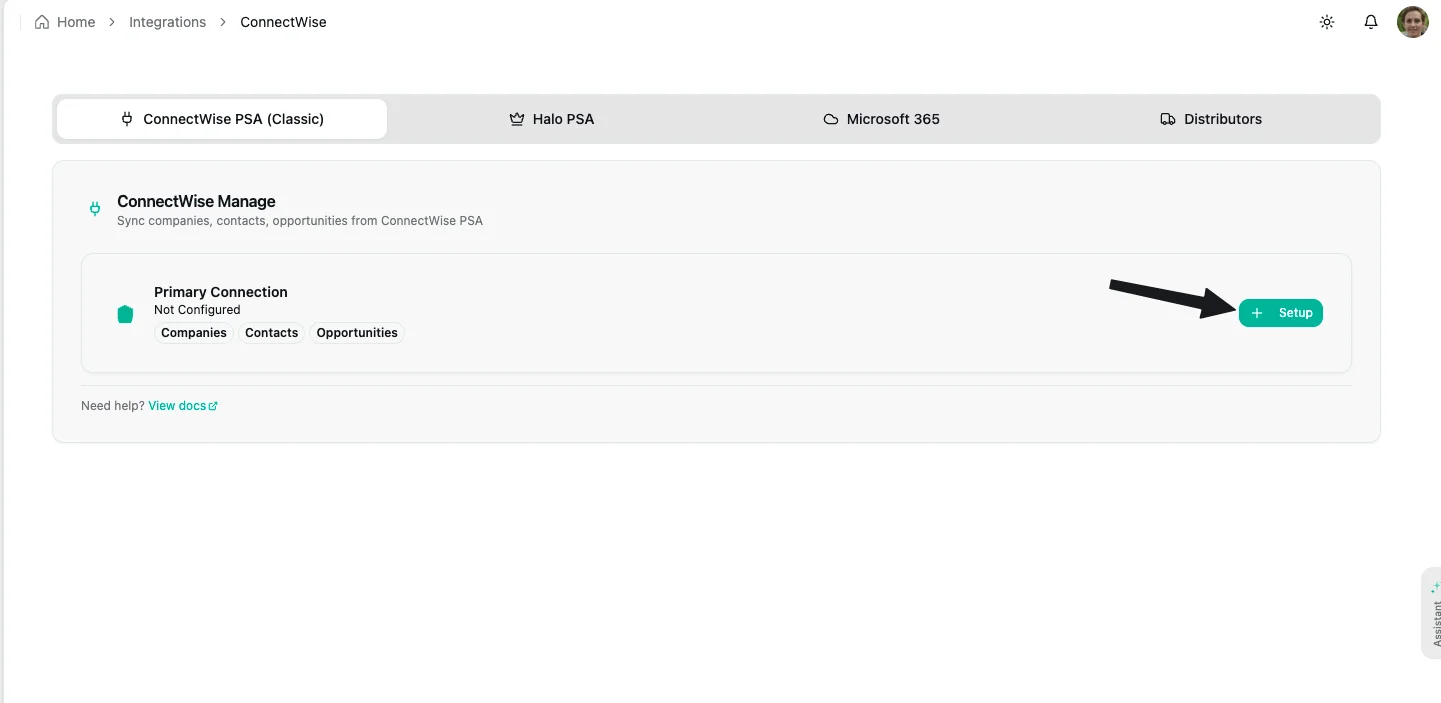
- On the ConnectWise Manage card, click + Setup to launch the setup wizard
Step 4: Enter Connection Details & Test
The setup wizard opens a multi-step dialog. The first step asks for your connection details:

Server URL: Your ConnectWise login URL (e.g., https://na.myconnectwise.net). Don't include the API path. Scopable auto-detects it.
Company ID: Your ConnectWise Login Company ID (what you type on the CW login screen). Find it under System → My Company → Company Information.
Public Key: The public key from Step 1.3. Paste the full key with no extra spaces.
Private Key: The private key from Step 1.3. It is stored securely in Scopable's Vault and never saved in plain text.
Test Your Connection
Click Test Connection before proceeding. Scopable validates your credentials against ConnectWise's /system/info endpoint. If the test fails:
- Verify the Server URL is the base URL, not the full API path
- Confirm the Company ID matches your ConnectWise login exactly
- Re-copy both keys, and watch for extra whitespace or line breaks
- Ensure the integrator login has "All Records" access
- Check that ConnectWise is reachable from the internet
Step 5: Choose Data Types & Configure Filters
After your connection test passes, the wizard walks you through data selection and optional filtering.
Select Data to Sync
Choose which record types to pull from ConnectWise.
Configure Company Filters (Optional)
If you only want to sync a subset of companies, click Discover Filters. Scopable fetches your available options from ConnectWise:
- Company Types (e.g., Customer, Vendor, Partner)
- Company Statuses (e.g., Active, Inactive)
- Territories (geographic regions)
- Markets (market segments)
Select your filters and click Preview to see how many companies match before committing.
If you skip filtering, all companies will be synced. You can always change filters later in the Sync Filters tab without re-entering credentials.
Step 6: Review & Start Initial Sync
- Review the summary: connection details, selected data types, active filters, and expected record counts
- Click Start Sync to begin the initial synchronization
- A progress bar shows real-time status (records created, updated, skipped)
- When complete, you're taken to the ConnectWise Integration Dashboard
The initial sync may take a few minutes depending on how many records are in your ConnectWise instance.
Troubleshooting
Connection Test Fails
- Use the base URL only (e.g.,
https://na.myconnectwise.net), not the full API path - Company ID must match your ConnectWise login Company ID exactly
- Re-copy both keys, and watch for trailing spaces or line breaks
- Ensure the integrator login has "All Records" access level
- Confirm your ConnectWise instance is publicly reachable
Filter Discovery Fails
- First verify that Test Connection passes
- Your API keys need read access to Companies, Types, and Statuses
- If your CW instance has no types/statuses configured, skip filters and sync everything
Sync Appears Stuck
- Check the Data Sync tab. If a sync shows as running for too long, use the Force Reset option
- The Sync Logs tab shows only lifecycle events (start/complete/error), not intermediate steps
- A stuck status usually means the sync process was interrupted. Resetting and re-running resolves it
Missing Contacts or Opportunities
- Contacts only import for companies already synced. Sync Companies first
- Opportunities require a matching company in Scopable. Unmatched ones are logged as skipped
- Check the Sync Logs tab for skip reasons
Frequently Asked Questions
Do I need to re-enter credentials to change filters? No. Go to the Sync Filters tab to adjust filters at any time. Your credentials stay stored in the Vault.
Can I sync only specific companies? Yes. Use the Sync Filters tab to filter by Company Types, Statuses, Territories, or Markets. Only matching companies are synced.
How do I trigger a sync? Go to the Data Sync tab and click Sync next to a data type, or Sync All Enabled for everything. ConnectWise webhook events also trigger real-time updates.
What if I need to update my API keys? Click Update Configuration in the Configuration tab. This re-opens the setup wizard where you can enter new keys. Old Vault secrets are automatically cleaned up.
Why are some contacts missing after sync? Contacts are only synced for companies that already exist in Scopable. Sync Companies first, then Contacts.
Can I sync data back to ConnectWise? Currently, write-back is limited to quote-linked opportunity fields (value, probability, stage, close date, contact). General write operations from Scopable to ConnectWise are not yet enabled.